Wednesday, February 17, 2016

Copycat Recipe: Starbucks Iced Lemon Pound Cake

8:29 PM Laura Tedesco

One of the privileges of attending a large university was a 24/7 Starbucks in the library. I frequented the coffee shop not for Venti Americanos but for the Iced Lemon Pound Cake. Between classes, I’d indulge in a slice of the tangy yellow cake (well, until I read the nutrition facts)—and ever since then, I’ve possessed a certain nostalgia for the treat. 


Which is why, for the last year, my phone’s photo album has included screen shots of a recipe claiming to be a near-perfect replica of Starbucks’ Lemon Loaf (as it used to be called). Of course, I took this screen shot when I was in the midst of what I call the Couch Era, those weeks after Asa’s birth when I barely left my living room. She was a baby who liked to be held as often as my college’s Starbucks was open, which meant I spent lots of time surfing the web—and lots of time imagining the desserts I’d someday bake, if I ever had more than 10 minutes to myself again.

One year later, that day has (finally) come, if you can count cooking with a one-year-old wrapped around your leg as “me” time—and my filed-away recipes are being put to the test. 

This one didn’t disappoint. 

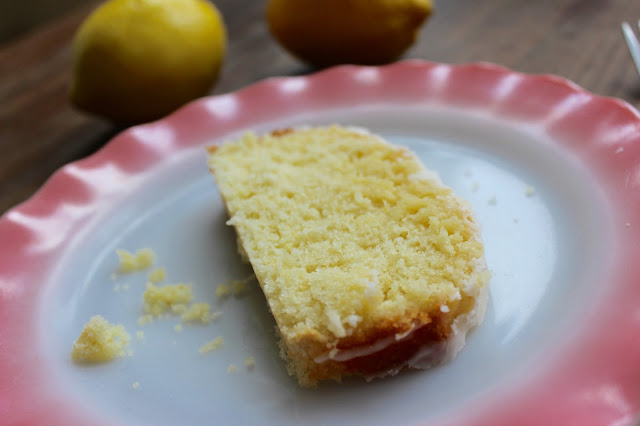
Although my loaf pan isn’t nearly as deep as the one Starbucks must use—my cake ended up only about half the size of the original—the taste was more than convincing. The secret, I believe, isn’t in the cake itself—it’s the dash of lemon extract in the powdered sugar-based icing, giving it just enough zing to trick your tastebuds into coming back again…and again…and again. (I’m to the stage where I’m just skimming off the top half of the cake, so I can ensure I enjoy a bit of icing with every bite.) 


I will admit the texture is a bit different than the original. The copycat recipe yields a light, fluffy cake, much like a traditional box cake, whereas the Lemon Loaf of my memory was denser (perhaps the reason Starbucks changed its name to pound cake). That being said, I have heard that Sweet Streets, the bakery that Starbucks supposedly buys from, makes its desserts, like, a year in advance, then freezes them, which could explain the textural difference. I’ll take freshness over density. 


In 2014, in a tragic turn of events, Starbucks discontinued the dessert, but after my lemon-loving brethren protested, the company brought it back. So if you've never tried it, get it while you can, in case Starbucks tries to can the cake again. Or just make this recipe, courtesy of Food.com...

What you need:
1.5 cups flour
1/2 teaspoon baking powder
1/2 teaspoon baking soda
1/2 teaspoon salt
3 eggs
1 cup sugar
3 tablespoons butter, softened
1 teaspoon vanilla
1 teaspoon lemon extract (hint: it's sold at Aldi for $1.99!)
1/3 cup lemon juice
1/2 cup oil

For the icing
1 cup powdered sugar
2 tablespoons whole milk
1/2 teaspoon lemon extract

Put it all together:

  1. Using a mixer, combine the eggs, sugar, butter, vanilla, lemon extract, and lemon juice, then add the flour, baking soda, baking powder, and salt. Pour in the oil, and mix until thoroughly incorporated. 
  2. Pour the batter into a greased 9x5" loaf pan, and bake at 350 degrees F for 45 minutes, or until a toothpick stuck into the center comes out clean.
  3. While the cake is cooling, combine all the icing ingredients. When the cake is cool, remove it from the pan, and drizzle the icing over the top. Let the icing harden before serving.


Monday, January 11, 2016

Inside My New House: How I Added Style to My Back Staircase

12:41 PM Laura Tedesco


Growing up, my house had two staircases, and my parents loved it: My sister and I could access our bedrooms without having to traipse up the front stairs (and make noise that could be heard in the downstairs master bedroom). So when I saw the back staircase in my new house, I was instantly excited, especially since it leads to the kitchen, giving me a direct route to the fridge when the need for a late-night snack strikes (hey, I'm breastfeeding!). 

One problem: It's a tight squeeze, since my house was built in the early 1900s, and there's no overhead light. These two factors conspire to make the space feel dark and cramped. In other words, these stairs seemed strictly utilitarian. Definitely not a design destination. 

But I loved the idea of having a place for Asa to sit while I cook, once she's a little older. The bottom step fits the bill, so why not make the whole staircase a kid-friendly space? (I feel a little crazy even considering this, since I just recently fell down these very stairs and fractured my sacrum!) 

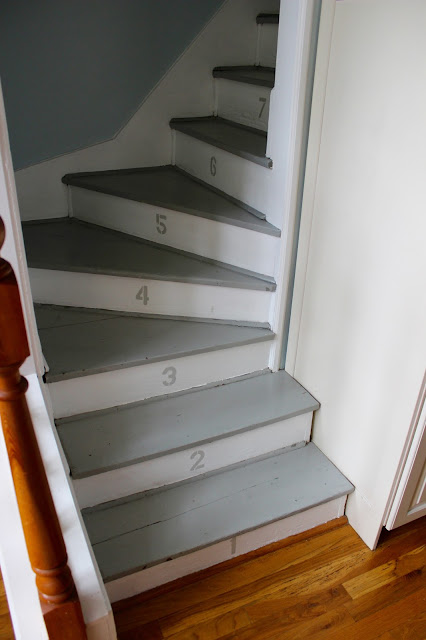
Turning the stairs into a jungle gym is a stretch. But since Asa's room is right at the top of the back stairs, I decided to number them, so she can count the stairs as she walks to her room. I bought a cheap set of Helvetica cardboard stencils from Michael's, painted the cream-colored risers white, and finally, painted the numbers in gray to match the existing color of the treads. 


To bring light to the dark stairwell, I painted the walls a light blue, the same color I used in my kitchen.


Then I created a space to display the artwork Asa will someday create. I purchased two backless, glass-less frames from Hobby Lobby (they're often on sale for half off), along with burlap-covered canvases that fit the insides of the frames. I used E-6000 glue to secure the canvases inside the frames, spray-painted clipboard clips gold, and used the same E-6000 glue to adhere them to the canvases. The end result: the perfect place to hang a rotating gallery of Asa originals. 


All of this cost me less than $100, and now, my staircase feels like so much more than a pass-through space. 

Monday, December 28, 2015

How to Make a State-Shaped "Vintage" Sign

9:40 AM Laura Tedesco


I've been working on decorating my breakfast nook, and after I (well, Frank) installed an antique schoolhouse light, I felt the space needed another vintage element. The large blank wall was practically begging for a vintage sign, except for one problem: The authentic ones are crazy-expensive.

I wasn't willing to spend a few hundred bucks on a sign for my kitchen. Plus, I wanted something personal: a sign advertising a spot in my hometown of Knoxville, Tennessee, or in my current town, Westminster, Maryland. I couldn't find anything that fit the bill.

So I decided to make a sign of my own.

Again, I didn't want to spend much money, so I decided to poke around underneath the porch of my 100-year-old house, hoping I'd find the perfect piece of wood. I found a long board that was angled at the ends, in a shape reminiscent of Tennessee. This was all the inspiration I needed.

I used a pencil to freehand the outline of Tennessee on the board, then had Frank cut it out with a jigsaw (specifically, a variable speed orbital jigsaw). While cutting it, he discovered my "antique" board was actually some sort of dense plastic, probably from the construction of our deck. So much for salvage wood! But it still worked!

Now: What to paint on my sign? 

Down the road from where I grew up was a little hole-in-the-wall restaurant called the Court Cafe. I decided to paint the name of the place on my sign, along with the word "Knoxville" and a picture of a pie.

The inspiration for my sign. The Court Cafe closed several years ago, but it now lives on in my kitchen!

I have a cabinet full of wall paint samples, so in keeping with my low budget, I decided to make do with these. 

But first, I had to find a font. I chose "DIN Condensed," for its vintage look. (If you want to make sure your font is truly from the era of your "vintage" sign, check out this database.) I started by painting the board a light gray (I used "Notre Dame" by Valspar).

Laying out my letters.
Then I printed the letters out on several sheets of paper, and instead of spending money on carbon paper, simply scribbled on the backside of the paper with a dark drawing pencil. I placed the paper on top of the board, used the same pencil to trace the outline of the letters, and voila, the lead on the back transferred to the board.

I used a small brush (size 6) to fill in the letters with white paint, then after they dried, used a gold Sharpie oil-based paint pen to outline them.

The painting begins!
I printed out a drawing of a pie, and as I did with the letters, scribbled on the back and traced the outline of the pie to transfer it to the board. I used more leftover paint from my basement (navy blue for the filling, beige for the crust, dark beige for shadowing on the crust, and light blue for the pan). I outlined the whole thing with the gold paint pen, then used a white paint pen to draw accents on the pan.


Finally, I used 40-grit sandpaper to rough up the whole thing, even my carefully painted letters and pie. Frank bought some D-ring hooks (the only part of the project that cost us anything), then hung it up, giving my breakfast nook the perfect vintage touch! 


Wednesday, December 23, 2015

7 Flavored Peanut Butters I'm Dying to Try

12:02 PM Laura Tedesco

I’m a peanut butter junkie. I’ve eaten it every day for breakfast for at least five years, and before that, ate it for lunch daily for nearly two decades. I’ve cycled through a number of brands, starting with Peter Pan as a preschooler, advancing to natural brands in my early 20s, and finally settling on Peanut Butter & Co. products as my go-to spreads. 

Although Peanut Butter & Co. PB isn’t as pure as the natural stuff—it contains more than just nuts and salt—it isn’t weighed down with partially hydrogenated oils, as many supermarket brands are. And it comes in a variety of tempting flavors (my favorite is Mighty Maple).

I’m loyal to PB&C, but I’m not a peanut butter exclusivist. If I see an unfamiliar jar on the shelf, I’ll probably try it, regardless of brand—and especially if it’s something a little crazy.

So which pumped-up PB’s do I have my eye on?

Pacific Beach Butterscotch Flavored Peanut Butter Spread


$13.36, amazon.com

I’m a little skeptical of this one since its name includes the word “spread”—a sign it doesn’t contain enough actual peanuts to be called plain ol’ peanut butter. But I’m willing to trade a few peanuts for undoubtedly delicious butterscotch flavor. Ice cream sundaes, anyone? 

Wild Friends Honey Peanut Butter with Crunchy Pretzel Bits


$6.39, vitacost.com

Honey peanut butter is nothing new. But honey peanut butter with little pieces of pretzel? Tell me more. The extra salty note from the pretzels, paired with the sweetness of honey, sounds like a recipe for by-the-spoonful snacking. 

Peanut Butter & Co. Pumpkin Spice Peanut Butter


As a long-time fan, I follow (okay, stalk) Peanut Butter & Co. on Facebook. When they announced they were debuting a pumpkin-flavored peanut butter, I started checking the shelves of my supermarket religiously…and never found it. I recently interviewed PB&C founder Lee Zalben (for this Yahoo Health story), and asked him if the pumpkin PB was nothing more than a cruel rumor. He confirmed its existence—but with a sad caveat. 

“We were a little worried, because we haven’t come out with a new flavor in a while,” he admitted. “But we sold out of the production within days, and it’s essentially completely sold out everywhere. It went faster than we could have imagined.” Fortunately, they’ll be making a LOT more next year, he said. I’m counting down the days.

PB Crave Razzle Dazzle


$17.94 for a 3-pack, PBcrave.com

Who needs jelly when you have this flavor-packed spread? It’s a sure-to-be-delicious combination of peanut butter, raspberry flavoring, white chocolate, semi-sweet chocolate, and honey. This just took peanut butter toast to a whole new level.

Reginald’s Homemade Bourbon Pecan Peanut Butter


As a southerner, I’m obligated to try this bourbon-, brown sugar- and molasses-infused peanut butter. In a nutty—and ingenious—move, Reginald (whoever this woman is, I need to meet her) added pecan chunks to her PB. Sounds incredible.

Reginald’s Apple Sin Peanut Butter


The whole forbidden fruit angle is cute—but I don't need to be enticed to try this apple-flavored peanut butter. Imagine: apple PB on top of apples. Your tastebuds might explode. 


Eliot’s Adult Nut Butters Garam Masala Peanut Butter


Savory peanut butters aren’t normally my thing. But with this one’s blend of cinnamon, cardamom, and cloves, I’m intrigued—and tempted to swap it in for regular PB in peanut butter cookies, as the maker suggests.


Monday, December 21, 2015

The Art of French Decorating: Steal the Style of Julia Child's Kitchen

6:46 PM Laura Tedesco

Back in November, Julia Child's former French cottage, known affectionately as "La Pitchoune," or "the little one," hit the market for the first time, listed at around $880,000. The famous chef's stucco getaway was built on the grounds of Simone Beck, co-author of The Art of French Cooking. Child and her husband Paul visited the 1,614-square-foot home every year from the time it was built into the 1990s, with the agreement that ownership would return to Simone and her husband once they were through with it. That happened in 1992, after Simone died.  

The kitchen of La Pitchoune was modeled after the one in the Childs' Cambridge, Massachusetts, home (which you can see on display at the Smithsonian), complete with extra-tall counters
Julia was 6-foot-2and pegboard in lieu of upper cabinets, presumably allowing Child to quickly grab whatever tool she needed, rather than rifling through cabinets. 


No one would describe Child's kitchen as masterfully decorated. It's cluttered and a little bit hodgepodge, with a high-end stainless steel gas stove just a few feet from a rather mundane white dishwasher. But it's also endlessly charming: The pegboard provides the relaxed vibe of open shelving,  the butcher block island is both functional and cozy, and the combination of the emerald-green backsplash and copper-colored terracotta flooring adds warmth and depth.

It's admittedly an unusual color combination for a kitchen, but it's undeniably statement-making, whether the mood of the room is relaxed (like Child's kitchen) or formal (like Cameron Diaz's NYC kitchen; see below).


So how can you steal all the charm of Child's kitchen, while upping its style quotient? 


Backsplash

Traditional: William Morris Vintage, Anemone in Emerald Green Small Square Tile ($16.85 per 6" square tile, zazzle.com)


Modern: Glass Subway Tile in Emerald Green by Giorbello ($15.82 per square foot, wayfair.com)


Budget: EliteTile Penny Porcelain Mosaic Tile in Emerald ($9.31 per square foot, wayfair.com)


Floor

Traditional: Solistone Hand Made Terra Cotta 6" by 12" Floor Tile ($9.60 per square foot, Home Depot)

Modern: Salerno Ceramic Tile American Wood Series Red Oak ($1.55 per square foot, BuildDirect.com)


Hint: Try wood-look tile in a herringbone pattern!

Budget: Marazzi Super Saltillo Desierto 12" by 12" Tile ($1.89 per square foot, Regal Floors)


Island

Traditional: Aurora Mills Maple Butcher Block Table ($1,379, OneKingsLane)

Modern: John Boos Work Table with Undershelf ($489.95, ChefsFirst.com)


Budget: French Country Small Workcenter ($489.98, overstock.com)

Light fixture

Traditional: Art Deco Antique Pendant Light ($375, ogtstore.com)
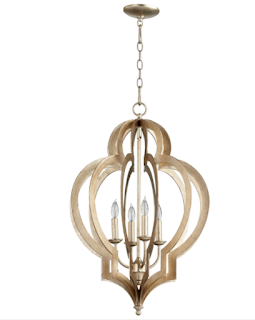
Modern: Cyan Design Vertigo Silver Four-Light Chandelier ($822.50, Bellacor


(Yes, this is a serious departure from the original. But this fixture glams up the space, if that's what you're going for.)


Budget: Camden Medium Federal Style Pendant with Mellon Glass Shade ($278.90, houseofantiquehardware.com)

Storage basket

Traditional: Antique French Square Picnic Wicker Basket with Lid ($136.27, Etsy.com)


Modern: Kelby Large Square Lidded Basket ($49.95, Crate & Barrel)

Budget: Birch Lane Large Woven Storage Bin ($39, Wayfair.com)


Shelf

Traditional: Knape&Vogt 24" Shelf-Made Images Instant Shelf ($37.99, wayfair.com)


Modern: Plank Floating Wall Shelf ($29.62, Walmart)

Budget: Lewis Hyman Venezia Shelf Kit ($23.45, Opentip.com)


Mortar and Pestle

Traditional: Antique French Mortar and Pestle ($199, eBay)


Modern: Marble Mortar & Pestle ($99.95, Williams-Sonoma)


Budget: French Kitchen Marble Mortar & Pestle ($29.95, Crate & Barrel)


Now see it all together...


Traditional


Modern


Budget